Equipment for beginner video creators is surprisingly simple: you don’t need a studio or expensive gear to start. The right equipment for beginner video creators focuses on clean audio, stable video, and basic lighting — and Bluetooth lavalier mics make this even easier.
Essential Equipment for Beginner Video Creators
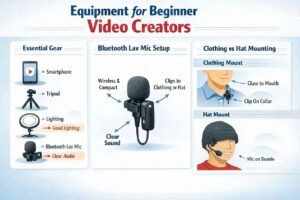
A beginner doesn’t need a studio or expensive gear. The real goal is clean audio, stable video, and decent lighting. The simplest setup that works for almost everyone includes:
- a smartphone capable of 1080p or 4K
- a Bluetooth lavalier microphone
- a small tripod or tabletop stand
- a basic light source (ring light or desk lamp)
- free editing software (iMovie, CapCut, DaVinci Resolve)
This setup is enough to produce videos that look and sound professional to the average viewer.
How to Choose Audio Equipment for Beginner Video Creators
Wired lavaliers technically work, but they create friction: cables get in the way, limit movement, and often get into the shot. Bluetooth lavs solve all of that.
Advantages of Bluetooth lavs
- freedom to move naturally
- no visible cable in the frame
- fewer accidental bumps and rustling noises
- faster setup and teardown
- easier outdoor recording
- better for vlogs, walk‑and‑talks, and dynamic shots
For a beginner, this means fewer technical mistakes and more focus on content.
Recommended beginner‑friendly Bluetooth lavs
- Ulanzi J12 — extremely popular for TikTok/YouTube Shorts
- Boya WM3T2 — compact, reliable, versions for iPhone/Android
- Maono WM820 — slightly better audio and range
- Hollyland Lark M1 — best sound in the budget category
All of these deliver clean voice recording without the hassle of wires.
Mounting a lav mic: clothing vs hat
Creators often clip a lav mic to a shirt collar, jacket, or even a hat. Each option has trade‑offs.
Mounting on clothing
This is the standard method and usually gives the best results.
- consistent distance to the mouth
- predictable direction of the mic
- minimal friction noise
- works indoors and outdoors
- easy to hide the transmitter on Bluetooth models
The only downside: some outfits have no good place to clip a mic.
Mounting on a hat
This method is surprisingly effective when done correctly.
Works well when:
- the hat fits snugly
- the mic capsule points downward toward the mouth
- the fabric is smooth and doesn’t rub
- the distance to the mouth stays within 20–30 cm
- you use a small windscreen outdoors
Potential issues:
- thick or wool hats create friction noise
- mic may point sideways or upward
- sound becomes slightly more “distant.”
- strong wind still requires a deadcat windscreen
For outdoor vlogs, winter shooting, or active movement, hat‑mounting can be the most convenient option.
Budget‑friendly gear upgrades ($150–300 range)
Once you’re comfortable recording, a few upgrades can noticeably improve quality.
Audio
- Hollyland Lark M1 — best wireless sound under $150
- Fifine K669B — great USB mic for desk recordings
Lighting
- Neewer 5600K LED panel — bright, reliable, inexpensive
- 12–14″ ring light — simple and effective for talking‑head videos
Stabilization
- Ulanzi MT‑16 — the best mini‑tripod in the budget category
- Amazon Basics tripod — cheap and stable enough for indoor use
These upgrades make your videos look cleaner and more consistent.
Upgrading Your Video Equipment as Your Channel Grows
Once you’re posting regularly and want a more polished look, consider stepping up your gear.
Cameras
- Sony ZV‑1 — compact, excellent autofocus
- Sony ZV‑E10 — interchangeable lenses, great for studio setups
- Canon M50 Mark II — beginner‑friendly hybrid camera
- GoPro Hero — for travel and action content
Wireless audio
- Rode Wireless GO II — industry standard for creators
- Rode VideoMic NTG — superb directional mic for indoor setups
Lighting
- Godox SL60W — powerful continuous light
- Softbox 60×90 cm — soft, flattering light for faces
These upgrades give your channel a professional look without going into high‑end cinema gear.
Common beginner mistakes
Most new creators run into the same problems. Avoiding them saves time and frustration.
- buying an expensive camera before learning basics
- ignoring audio quality
- shooting in poor lighting
- overbuying gear instead of mastering essentials
- recording handheld without stabilization
- not testing audio before filming
- letting clothing rub against the mic
- hiding the mic under thick fabric (kills clarity)
Good technique matters more than expensive equipment.
Three ready‑made gear kits
These kits help beginners choose without overthinking.
Starter Kit (0–50 USD)
- smartphone
- Bluetooth lav (Ulanzi J12 or Boya WM3)
- desk lamp
- mini tripod
Regular Creator Kit (150–300 USD)
- smartphone
- Hollyland Lark M1
- Neewer LED panel
- Ulanzi MT‑16 tripod
Growth Kit (600–1200 USD)
- Sony ZV‑E10
- Rode Wireless GO II
- Godox SL60W + softbox
- Manfrotto tripod
Closing thought
For beginners, the most important upgrade is wireless audio. It removes friction, improves sound, and makes filming more enjoyable. Whether clipped to clothing or a hat, a Bluetooth lav mic gives you freedom and consistency — the two things that help new creators stay motivated.
Would you like this article turned into the North‑American SEO version with keywords, meta description, tags, and a featured‑image alt text?
- Part 1: Starting a Video Channel: Only When You Can’t Not Do It
- Part 2: How to Choose Your Channel’s Topic and Style
- Part 3: Equipment for Beginner Video Creators
The following Russian‑language articles were used as foundational reference materials while preparing this guide. They offer beginner‑level perspectives on starting a video channel and reflect common advice shared in early creator communities:
- “How to Become a Video Blogger: Tips for Beginners” — an overview of basic steps, early decisions, and common mistakes new creators face when starting a channel.
- “How to Become a Video Blogger: Advice for New Creators” — a short introduction to choosing a topic, preparing for on‑camera work, and understanding the psychological side of public content creation.
- “20 Useful Tips for Beginner Video Bloggers” — a practical list of recommendations focused on discipline, consistency, and the technical basics of filming and publishing videos.